Job configuration for upload type UNC (UNC jobs)
Jobs with the upload type Network (UNC) perform data uploads from shared network resources using the UNC (Uniform Naming Convention) protocol.
-
In the Project tree, select the component.
- In the menu tab, click on Create or drag-and-drop the components into the Jobs section.
-
Check in the section Job configuration, if the upload type Network (UNC) is being displayed.
- Configure the settings for the following sections: General, Notification, Upload and compare, Create a version automatically after job run. The Notification and Create a version automatically after job run sections are only displayed if the necessary settings have been implemented.
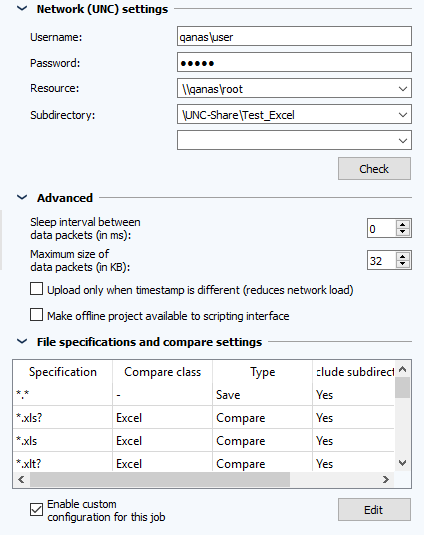
Section Network (UNC) settings
- In the Username and Password fields, enter the user credentials for the person that will be used to access the network resources. The user will need to have the necessary access rights.
- Under Resources, enter the computer name or IP address of the computer you want to access over the network. You can check if the user can access the computer or the entered combination of computer and subfolder by clicking the Check button. If the check is not successful, the job will also fail.
- If these details are already saved in the FTP server's subdirectory, enter the subdirectory's path in the field Subdirectory.
 With these login details, you should be able to access the subdirectory.
versiondog supports up to 10 sub-directories per job.
Only when you enter the subdirectory, not only will the entire path on the FTP server in the backup be displayed, but also the most recent directory in the path:
Example:
Path on the server: /folder1/subdirectory1/*
Composition of backup: Archive.zip/*
If you enter multiple subdirectories, the entire directory structure will be included in the backup.
Example:
Path on the server: /Directory1/subdirectory1/subdirectory2 and /directory1/subdirectory1/1234
Composition of backup: Archive.zip/directory1/subdirectory1/subdirectory2 and archive.zip/directory1/subdirectory1/1234
Section Additional
- You can reduce the network traffic, that is caused by the job, by increasing the sleep between packets and reducing the maximum size of data packets. Higher values for the sleep and lower values for the maximum packet size will result in longer times for job execution.
- Check the Use timestamp check to reduce network traffic checkbox. The timestamp instead of the content of the files will be verified. This will ensure that only new and edited files are uploaded for the backup. Files without changes will be taken over from the previous backup. This will further limit network traffic.
- The checkbox Make offline project available to scripting interface enables to upload scripts, that were started by the job, to access the latest checked-in version.
Section file specifications and compare settings
Normally, comparisons are executed using compare settings of the component. Job specific modifications can be made in this section.
The table shows the set compare and save behaviour.
Check the Enable custom configuration for this job checkbox and click on Edit. Set new parameters for the comparison and save process in the new open window.
|
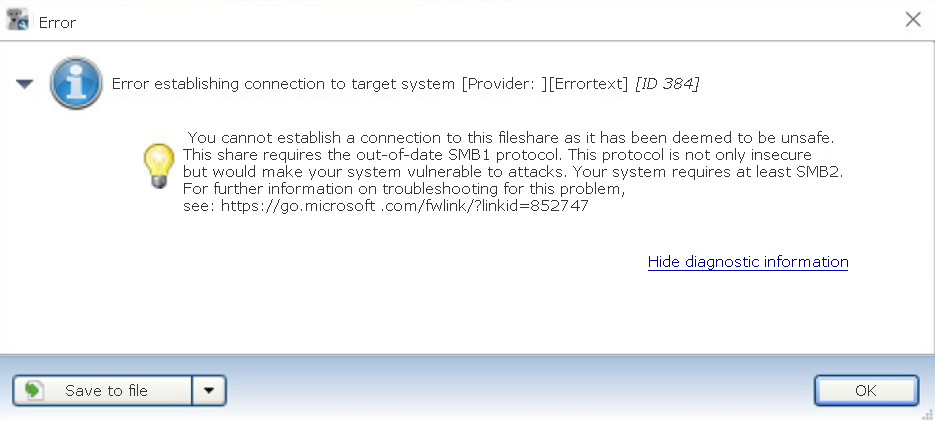
UNC Job: how can I correct the error message: “Error connecting to target system” [ID384]"?
When setting up a UNC job, errors can arise under the following circumstances:
The cause for this is that the operating system WinXP SP3 uses the SMBv1 protocol. The SMBv2 protocol was introduced in Windows Vista and Windows Server 2008. The SMBv3 protocol was introduced in Windows 8 and Windows Server 2012. When you reinstall windows, the SMBv1 protocol will be deactivated as standard for security reasons. Vulnerabilities in SMBv1 allow attacks via the network and the execution of malicious code on machines that can be reached via the network.
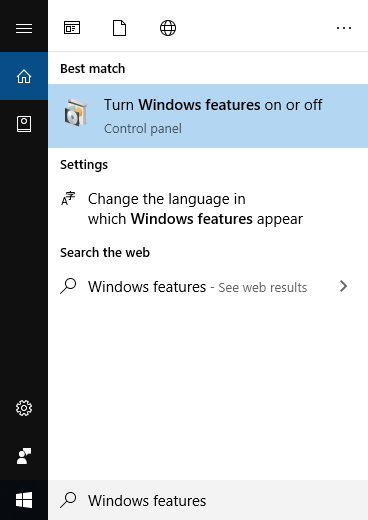
Potential solutions:
Proceed as follows: 1. Open Windows features and functions:
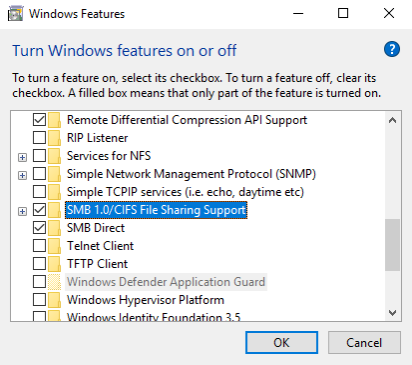
2. Activate SMB1 protocol:
3. Download the necessary files from the internet:
4. Restart your system.
|


| Related topics |
|---|